
This incredibly helpful guest post is by John Milnes over at Daddy Photo Blog. He has a gorgeous daughter and loves taking photographs!
***
I’ve been an amateur/intermediate photographer for the better part of 25 years and if you’re a novice photographer, I hope you find these tips helpful!
You don’t need a top of the range camera – I’m really happy with my midrange camera for intermediate users, a Nikon D5300. A small compact camera can cost from £50 to £200. If you’re looking for a higher zoom lens or for much sharper crisper images, a higher mega pixel rated camera, the cost will rise accordingly.
The two main players in the market are Nikon and Canon. DSLR’s (Digital SLRs) can take images up to 50.6 megapixels such as the Canon 5DS. The Nikon D810E can capture images up to 36 Megapixels. Both cameras have duel memory card slots. A CF Card and an SD Card (CF stand for Compact Flash, SD stands for Secure Digital Card). This means that if one card fails you’ll have a back up card with the same images!
My Nikon D5300 take images up to 24 megapixels. This camera also has a WIFI function so you can use your tablet/iPad or phone/iPhone as a hands free shutter. You can then transfer the images to Facebook if you wanted to. You can get a decent memory card from either Amazon or eBay for about £20. I personally would recommend a 32GB (giga byte) SD card. SanDisk – Transcend – Samsung and Kingston are some of the best cards on the market. These memory manufactures are considered the best for their reliability, customer services and warranty.
A 32GB SD card can store 1900 images in Jpeg format. I use RAW for my images, which is the setting where all the colours are uncompressed so you can edit the photograph more freely than you can in Jpeg format, and maintain their original colours. You can then edit them using Photoshop or Lightroom (another image touch-up software application by adobe).
Lenses & Their Settings
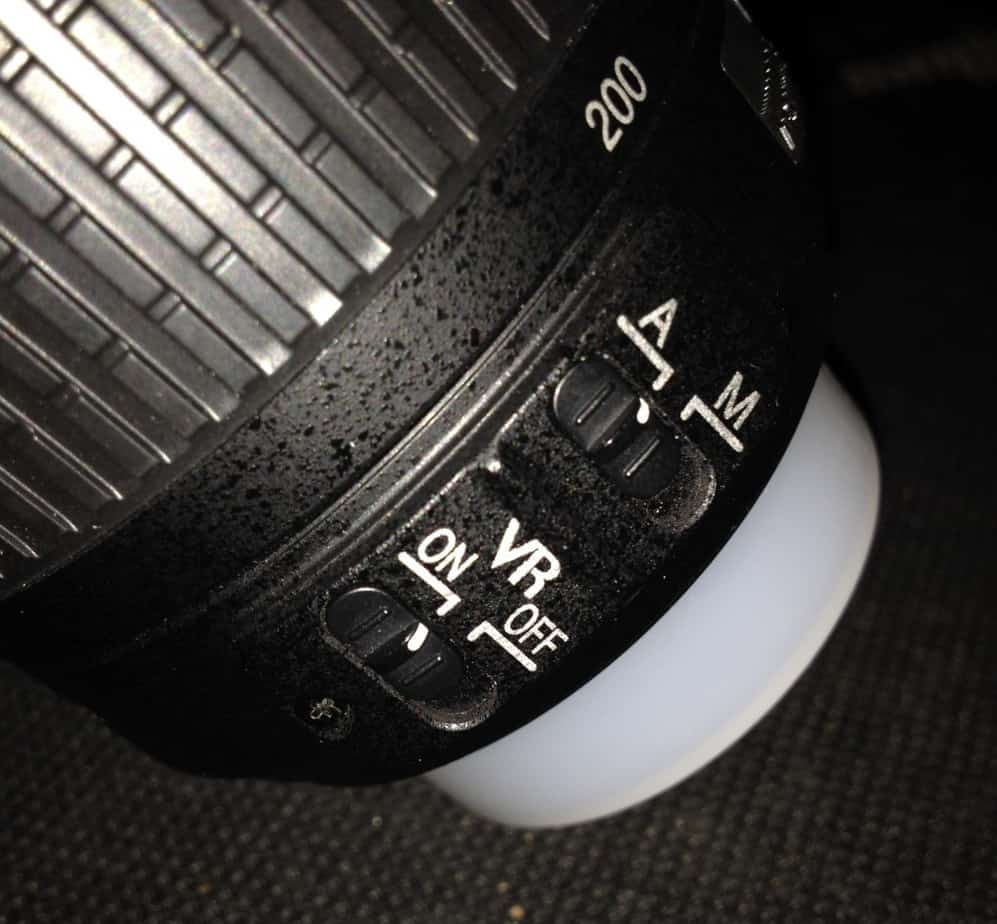
This is a 55-200mm lens with the Autofocus and manual focus switch. This lens also has ‘VR’ which is short for Vibration reduction. This is to reduce the shake you get when holding the camera, which can make your photographs appear blurred.

The same 55-200mm lens but this time showing the numbers which other photographers will look for, so they can see how fast it is and what the aperture speed is.
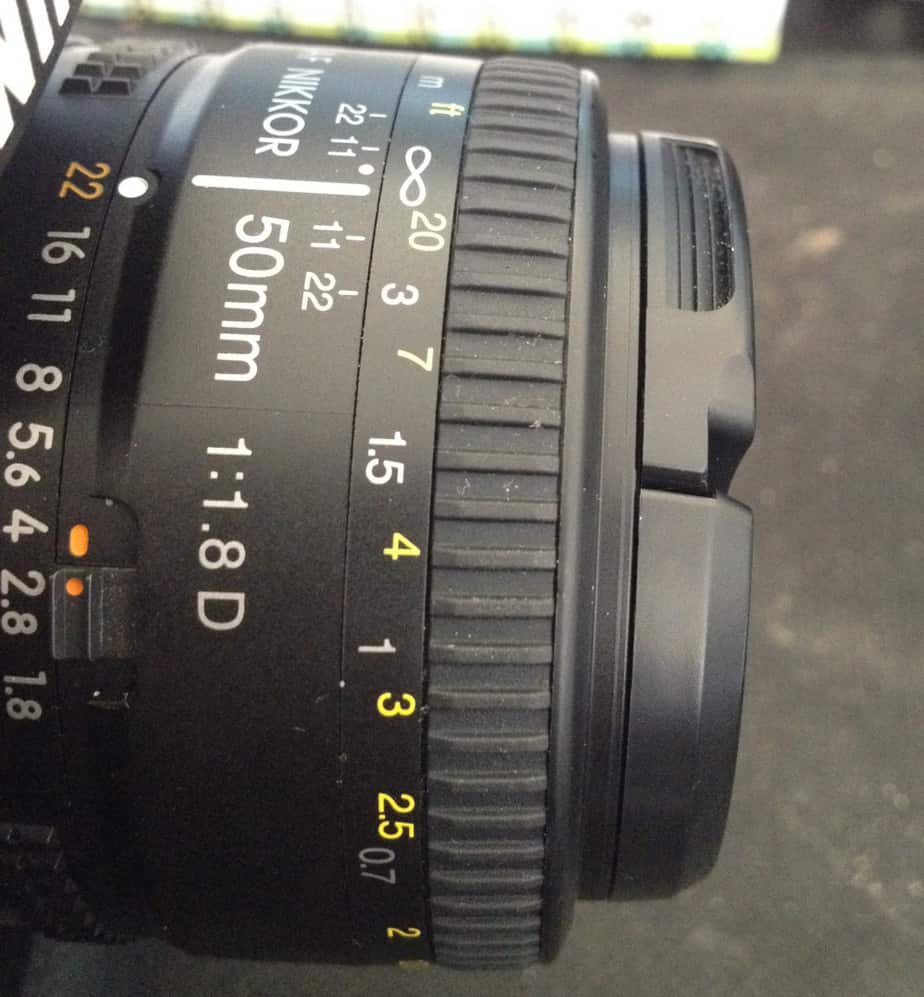
This is a Nikon AF 500mm 1:1.8 D. This is one of the early 50mm prime lenses, which Nikon released to the market. It is does not have a build in motor so it will not autofocus on the Nikon D3200 or the D5300 camera’s. The user will have to rely on 100% manual focus for this lens for the fore-mentioned cameras.

These memory cards can hold around 3,400 images between them: 2 x 32GB Samsung SD cards and 1 x 64GB SD card.

The main buttons on the top of the camera. The On/Off switch is self explanatory, with the main shutter release button. To the left, is the movie start/stop record button. Bottom middle is LCD display Information display. It allows you to see what your shutter speed, aperture, ISO, White balance etc etc. Right +/- button is the exposure compensation button, but in manual mode, it becomes the aperture adjustment button.
These next two images are of the LCD screen and different settings, which can be used for different types of photographs. I use manual mode for my camera to give more control over the amount of light coming into the camera:
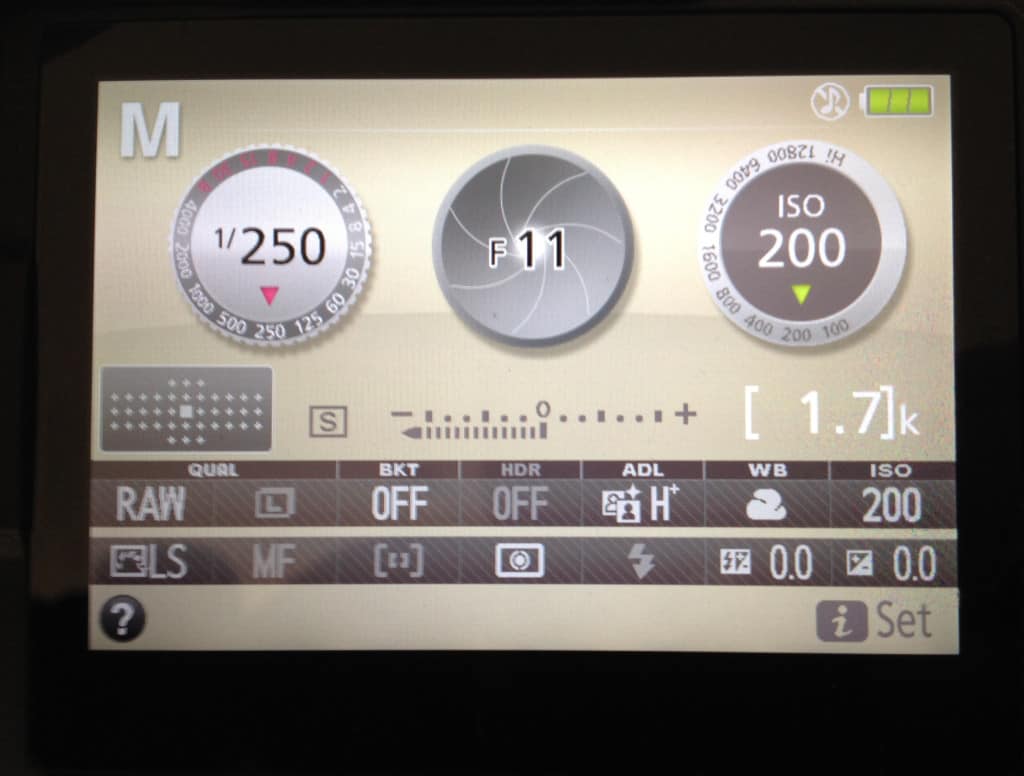
Image 1: Great For Outdoor Shots: Shows my shutter speed at 1/250th of a second. My aperture is set to f/11. This means there is less light coming in to the lens but I can get clearer images for both the foreground and background. My light sensitivity (ISO) is set to 200.
 ’
Below my shutter speed, aperture and ISO; are my remaining images left for the memory card I have. As you can see, this says 1.7k (which means 1,700 photographs left). The rest of the settings are WB (White Balance, how warm you want your picture. This can be changed in Adobe Lightroom or Photoshop if you shoot in RAW format).
ADL stands for: Active D-Lighting optimizes high contrast images to restore the shadow and highlight details that are often lost when strong lighting increases the contrast between bright and dark areas of an image. It can be set to operate automatically or manually, and it’s also possible to bracket pictures to get one with Active D-Lighting and one without (Nikon EU Website).
BKT means bracketing, which I personally don’t use.
The +/- indicators are for exposure compensation. These are expert settings where you can reduce the amount of light even further if it is too bright outside, or not bright enough. There is no real need to touch these unless you are fairly confident you know what you are doing.
The 2nd +/- with what looks a little lightening is for the Flash compensation where you can increase the power the flash if you need to. If you were using an external flash, you would change the power on the eternal flash rather than these indicators in the camera.
The next one that is lit up, is the matrix metering setting. This is a very complicated subject to chat about, but if you are new to photography you don’t really need to touch this. If you really want to know more, you can read more about Matrix Meteringhere.
The last one to the left under RAW is called ‘Set Picture Control’. This is usually set to SD or Standard by factory default. You can change this if you want just a bit more colour for the photograph you are taking; otherwise there is no real need to change this.
The focal point (to the left of the shutter speed, grey with lots of little dots) is the main focus of the shot. You can either do this manually or automatically. Say if I’m taking a picture of my daughter but I want to focus on her eyes yet get the whole of her in the photograph, I can use dial next to the LCD screen to move it where I want. This will also move a little black box, which I can see in my viewfinder while I’m looking at my daughter and place that black box on her eyes.
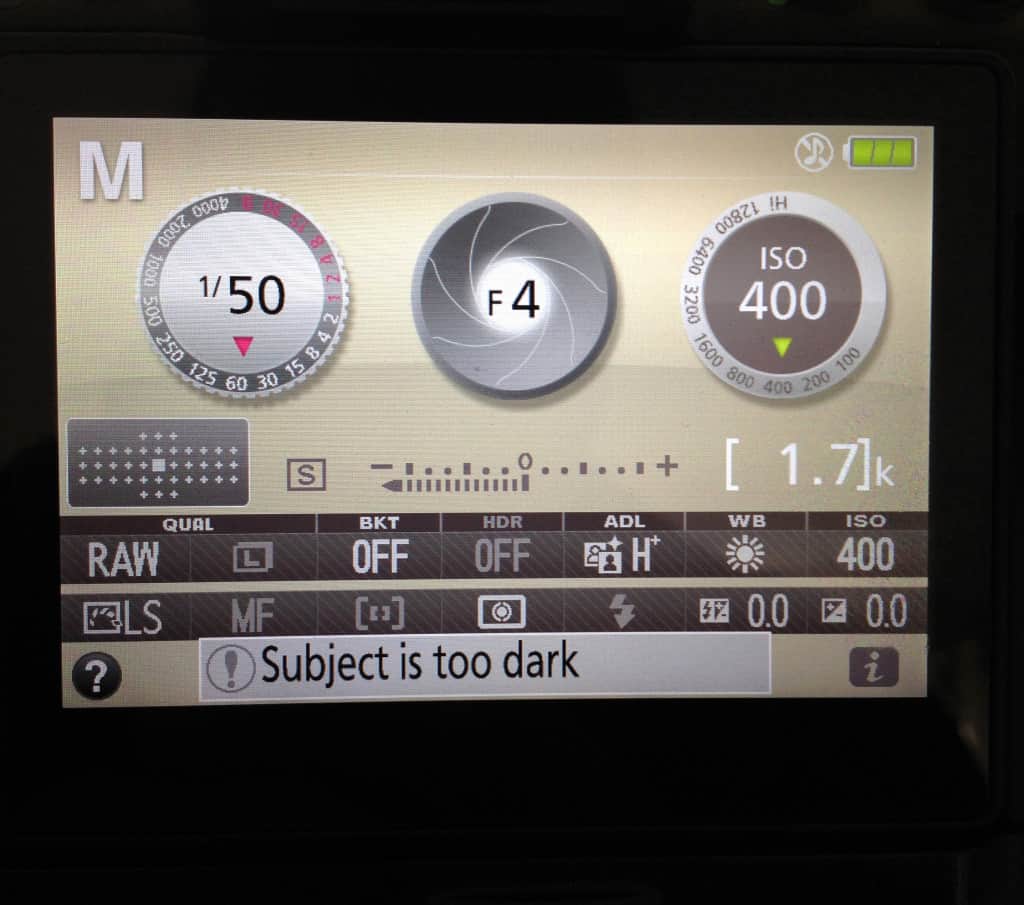
Image 2: Great for indoor shots: Here the shutter speed has been set to 1/50th of a second. This would normally be used indoors where the light is poor. Aperture settings at f/4, this has been lowered to allow more light in through the lens. ISO: Again this is for mainly indoors along with the ISO of 400. So, if the light in the sitting room was poor, or if I had the lights in the sitting room switched on. Then I would need to have the ISO, (remember the ISO is for light sensitivity for that photograph) of 400 and above. If I were taking action shots of my daughter, I’d need to raise the ISO up to around 3200 so I could take faster photographs, or ‘up’ the shutter speed to compensate for her movement.
Even if taking photos indoors with fairly good natural sunlight, you may still need an extra source of light, like a flashgun. I use a Neewer TT860, which is the same as Nikon Speedlight SB900. The Nikon Speedlight is way more expensive, whereas the Neewer TT860 has packaged extras at a fraction of the cost.
If an image is under exposed (too dark). The shutter speed is way too high and if it’s over exposed (too light), then the shutter speed is too low. Lowering the shutter speed also increases the likelihood of image blur. So there is a fine balance to be made between image blur and low shutter speed. Increasing the flash power, position or angle is another way of keeping the image well lit, without lowering your shutter speed. Normally, for an external flashgun mounted on the camera, my shutter would be at 1/60th of a second or 1/60s for short.
The Internet has a wealth of resources and tutorials. One of my favourite websites is the Digital Photography School. It has everything, from tutorials on cameras, to how to do certain types of photography. It has a wealth of hints and they’re all free. I personally use Adobe Lightroom CC , a user friendly photo editing software.
John Milnes is a Dad and blogger over at DaddyPhotoBlog.Com.
You can also visit him on Facebook and Twitter
***
You may also like to have a browse through some of our posts including:
Indoor & Outdoor Party Games
Carry On Self-catering
Potty Training A Child With Zero Interest
For Kids That Hate Maths
To receive our Magical Newsletter …
Magical moments for you and your child to share
Take your children on a magical journey with these unique, hand-drawn letters from two of the most magical places on earth … the North Pole and Fairyland.
Hide them among the bills and junk mail, lay them on the table first thing in the morning, stashed among the toys, or snuggled up in their bed. You choose where your children find the letters, to create a magical family tradition the kids will love!
***


Download your FREE Guides To Common Christmas Conundrums

“The best Christmas idea ever.” – Charlie Condou (Actor)
***
“These were the best things I have ever (and I mean ever) ordered!!
I’ve never seen the magic or happiness last so long x”
– Jolene (August 2017)
***
If your child believes in Father Christmas and you want to keep the magic for as long as possible, There are DIFFERENT and NEW! Christmas Letters each year! You can preorder these for Christmas 2018 for dispatch from September.
***
***
Fairy & Tooth Fairy Letters

Fairy letters from a world of dragons (who set fire to your lunch by mistake), Mystery Gardens (with changing adventures inside), Magical Potion Fairies, Secret Underground Passageways, Magical Tree Bark, Time Travel … and more.
***
Dummy Fairy Letters are available too!
Come and join us on Facebook, or find us over on Christmas Traditions & Magic For Children for all year round festive chat.
To receive my blog posts, please sign up at the right hand side of this page or for Product or Christmas News and promotions from the International Elf Service, please sign up at the bottom of the page.
Emily x
A Without preorder…
***
Download your FREE Guides To Common Christmas Conundrums
“The best Christmas idea ever.” – Charlie Condou (Actor)
***
“These were the best things I have ever (and I mean ever) ordered!!
I’ve never seen the magic or happiness last so long x”
– Jolene (August 2017)
***
If your child believes in Father Christmas and you want to keep the magic for as long as possible, There are DIFFERENT and NEW! Christmas Letters each year! You can preorder these for Christmas 2017 for dispatch from September.
***
***
Fairy & Tooth Fairy Letters

Fairy letters from a world of dragons (who set fire to your lunch by mistake), Mystery Gardens (with changing adventures inside), Magical Potion Fairies, Secret Underground Passageways, Magical Tree Bark, Time Travel … and more.
***
Dummy Fairy Letters are available too!
Come and join us on Facebook, or find us over on Christmas Traditions & Magic For Children for all year round festive chat.
To receive my blog posts, please sign up at the right hand side of this page or for Product or Christmas News and promotions from the International Elf Service, please sign up at the bottom of the page.
Emily x
A very useful post – thanks for sharing these tips. I am constantly trying to learn and improve my photography so will be bookmarking this to refer back to.
I love your photos Nomita!
A very helpful article. 🙂
Isn’t it just?? I can never remember what all the gizmos do
Thank you for asking me to do this guest post.
Truth be told, there was just too much subject content to cover. I am going to go over some of these settings when I get my blog back and running. Once again, thanks for letting me do this guest post.
John – aka – DaddyPhotoBlog.com
Thank you so much for doing it John! It’s great to have a more user friendly explanation for all the settings than the user manual gives! I never quite got my head around them!